Generate Web Client URLs
Example: Use this activity to create a token for a Laserfiche entry and put this token in an e-mail. The recipient of the e-mail can use the generated URL to connect to the Laserfiche web client off-site and access the entry in the repository without having the Laserfiche Client installed.
![]() How does this activity look in the Designer Pane?
How does this activity look in the Designer Pane?
To add this activity to a workflow definition
- Drag it from the Toolbox Pane and drop it in the Designer Pane.
To configure this activity
Select the activity in the Designer Pane to configure the following property boxes in the Properties Pane.
-
 Activity Name
Once added to a workflow definition, the default name of an activity can be changed. Providing a custom name for an activity helps you remember the role it plays.
To name an activity
- Add an activity to your workflow by dragging it from the Toolbox Pane and dropping it in the Designer Pane.
- Select the activity in the Designer Pane.
- Under
 Activity Name in the Properties Pane,
replace the default name.
Note: Activity names cannot be the same as any other activity name in the workflow, they cannot be the same as the workflow's name, they must be less than 100 characters, they must contain at least one alphanumeric character, they cannot be "Name," and they cannot be the same as the activity's runtime type (which is usually only an issue with custom activities).
-
 Activity Description
Use the Activity Description to provide descriptive text to help you remember the role that the activity plays in the workflow. All activities contain a default description that you can modify while constructing your workflow.
To modify an activity description
- Add an activity to your workflow by dragging it from the Toolbox Pane and dropping it in the Designer Pane.
- Select the activity in the Designer Pane.
- Under
 Activity Description in the Properties Pane, replace the default description.
-
 Entry URLs
The
 Entry URLs property box allows you to configure URLs for the Laserfiche web client entries. The Generate Web Client URLs activity makes these URL available as tokens.
Note: You can only create eight Entry URL tokens with a single Generate Web Client URL activity.
To configure the Entry URLs property box
- Add the Generate Web Client URLs activity to your workflow definition by dragging it from the Toolbox Pane and dropping it in the Designer Pane.
- Select the activity in the Designer Pane.
- In the Properties Pane, under Web Client URLs, click New Token.
- In the
 New Web Client URL dialog box, type a name for your web client URL token next to Token Name.
 - Select the entry for which you want to create a web client URL.
- Under Starting Web Client URL, type the URL for your the Laserfiche web client start page (e.g., http://machinename/laserfiche).
- Next to Link action, select how you want the entry to open when the link is clicked.
- View entry: Opens the entry in the Laserfiche web client. If the entry is a folder, it will open in the Folder Browser. If the entry is a document, it will open in the Document Viewer.
- Display folder as the root folder?: Optionally, choose to display the folder or the parent folder (if the entry is a document) as the root folder in the repository and hide the rest of the repository's folder tree.
- If the entry is an electronic document: Choose to have it:
- Open based on the default settings in the Laserfiche web client
- Open in the Document Viewer
- Exported and downloaded
- Open with the Microsoft Office Integration
- View metadata: Opens only the metadata associated with the entry. Next to Initially display select which tab of the metadata will be selected and displayed when the link is clicked.
- Check in entry: Opens the Laserfiche web client, and prompts you to browse for a file to check in.
- Check out entry: Checks the entry out of the Laserfiche web client. More info.
- If the entry is an electronic document: Choose to have it:
- Open based on the default settings in the Laserfiche web client
- Exported and downloaded
- Open with the Microsoft Office Integration
- Optional: Click Test to ensure the Starting Web Client URL is entered correctly.
- In the
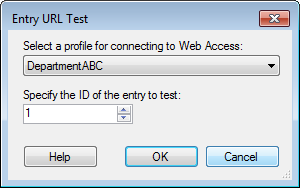
 Entry URL Test dialog box, select the Connection Profile of the repository that will contain the entry this activity will access.
 - Specify the Entry ID number of an entry in the repository selected in the Starting URL Test dialog box.
- Click OK.
- If the Web Client URL is configured correctly, the Laserfiche web client will open the entry with the ID you specified, and with the link action you configured.
- Click OK.
- Optional: You can add to and organize your custom tokens in the
 Entry URLs property box in the activity's Properties Pane.
 - Hide the entry and starting URL details in the Entry URLs property box by clicking Hide Details.
- Modify an Entry URL token by clicking on the token's name or details.
- Create additional tokens by clicking New Token.
- Delete a token by clicking the red X
 .
.
Note: Specifying a connection profile allows Workflow to get information about the entry from the Laserfiche web client. It does not log into the web client as the Workflow User to show the entry.
Note: You may be prompted to log into the Laserfiche web client before the entry is shown, depending on your web client settings. More info.
-
 Search URLs
The
 Search URLs property box allows you to configure URLs for Laserfiche web client search results. These URLs can open either the results of a saved search or the results of a custom search specified by Laserfiche advanced search syntax. The Generate Web Client URLs activity will turn these URLs into tokens.
Note: You can only create eight Search URL tokens with a single Generate Web Client URL activity.
To configure the Search URLs property box
- Add the Generate Web Client URLs activity to your workflow definition by dragging it from the Toolbox Pane and dropping it in the Designer Pane.
- Select the activity in the Designer Pane.
- In the Properties Pane, under Search URLs, click New Token.
- In the
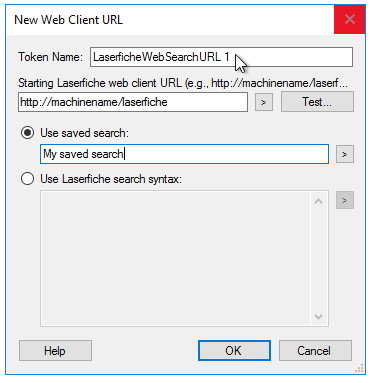
 New Web Client URL dialog box, type a name for your Search URL token in the Token Name text box.
 - Under Starting Web Client URL, type the URL for your the Laserfiche web client start page (e.g., http://machinename/laserfiche).
- Select one of the following:
- Use saved search: Type the name of a web client saved search. Click the Token button (right arrow)
 to use tokens. Learn more about saving searches in the Laserfiche web client.
 - Use Laserfiche search syntax: Enter the advanced search syntax for your search in the text box. Click the Token button (right arrow)
 to use tokens. More information.
 - Optional: Click Test to ensure the Starting web client URL and the searches are entered correctly.
- In the
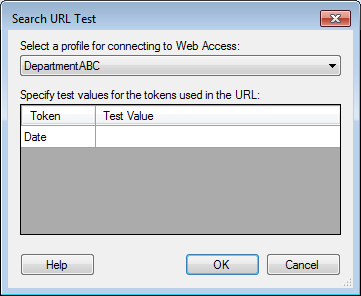
 Search URL Test dialog box, select the Connection Profile for the repository that contains the search results you want this activity to create a URL for.
 - Specify values for the tokens you used when specifying a saved search or advanced search syntax.
- Click OK.
- If the the Laserfiche web client URL is configured correctly, the client will open the search results for the search you specified.
- Click OK.
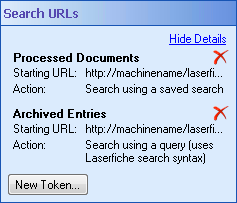
- Optional: You can add to and organize your custom tokens in the
 Search URLs property box in the activity's Properties Pane.
 - Hide the starting URL details in the Search URLs property box by clicking Hide Details.
- Modify a Search URL token by clicking on the token's name or details.
- Create additional tokens by clicking New Token.
- Delete a token by clicking the red X
 .
.
Tip: Open the Laserfiche web client. In the client's Search Pane, open the Advanced Search box and perform a search that will return the same type of results you want search URL to return. Copy the advanced search syntax in the Advanced Search box, and paste the syntax into this text box. You can then change the syntax (for example, by inserting tokens for hard-coded values).
Example: To create a URL that brings up a list of all the entries created on the day this Generate Web Client URL activity runs, copy the advanced search syntax for searching by date in the Laserfiche web client or the Client: {LF:Created="3/18/2013"}. Replace the date, 3/18/2013, with the date token, %(Date): {LF:Created="%(Date)"}.
Note: Specifying a connection profile allows Workflow to get the saved searches from the Laserfiche web client. It does not log into the web client as the Workflow User to show the search results.
Note: You may be prompted to log into the Laserfiche web client before the search results are shown, depending on your client settings. More info.


